Have you ever blocked anything? Some things are fine right when they come off the hook, and so you may be tempted to not block them. Especially big, bulky things like large blankets. But, blocking is really a game changer when it comes to a project looking really finished.

With doilies, it’s a no brainer. Doilies are usually made with very fine cotton thread in a lacy pattern that really shines when it’s blocked and opens up.

Take for example, this doily I made using Grace Fearon’s design Whitney

Whitney by Grace Fearon

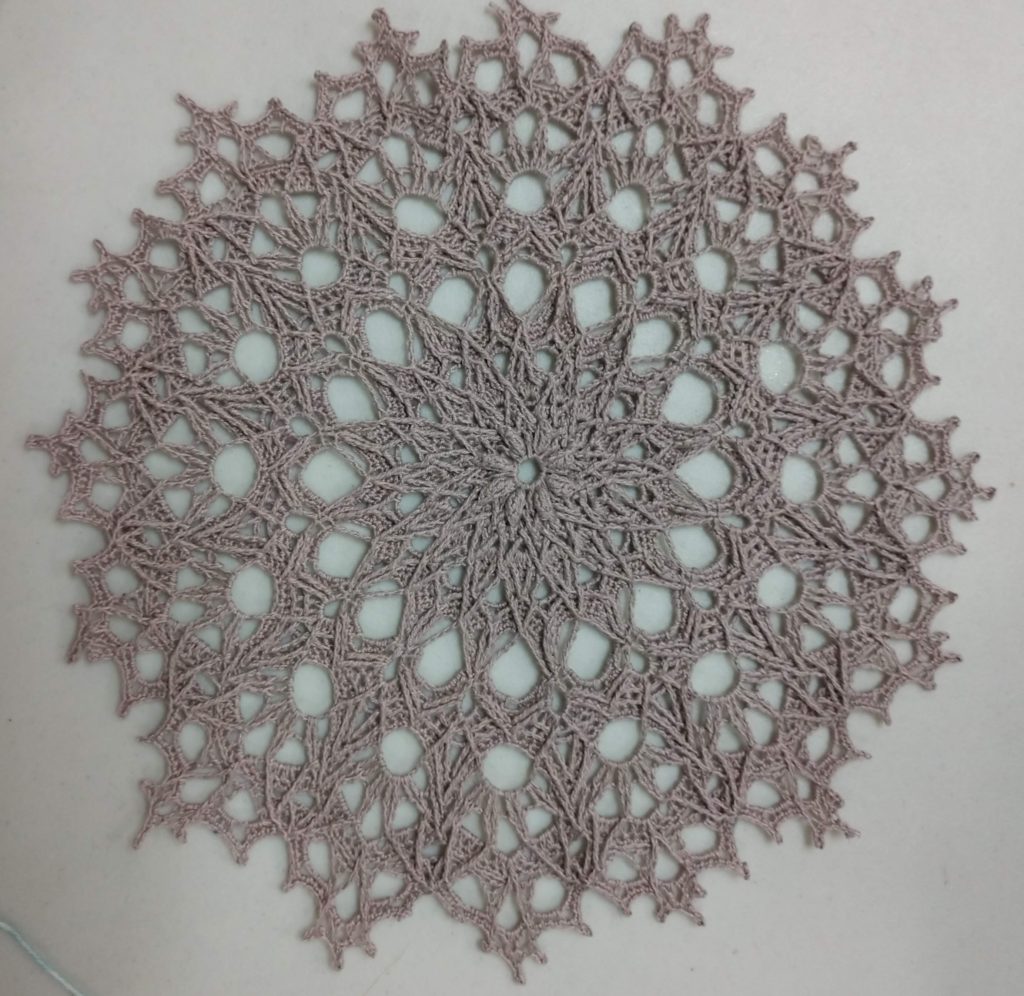
It’s beautiful, isn’t it? Very lacy and lots of delicate little picots around the edges. Let me tell you, it was a nightmare to block. But, so very worth it for this finished product!

This next photo is Whitney before blocking.

Whitney by Grace Fearon, before blocking.

Hardly looks like the same doily, does it? It’s kind of thick, and while you see there are detailed post stitches throughout, it doesn’t really wow me.

Just to really appreciate the difference, here’s a side by side.

Whitney by Grace Fearon, unblocked and blocked

So, how do you achieve those results?

For something like a doily, a wet block works best. Some people like to soak in a corn starch and water mixture, or use liquid fabric starch. I don’t like stiff doilies, so I stick to just water.

Next, I set up my blocking boards. If you have interlocking foam mats, those work great! I bought this set and I love them. If you’re making doilies, they have concentric circles to help you line up your outer edges and know they’re symmetrical. As you can see, I didn’t use those for this project because I was blocking several things at once and I needed all the space.

This set happens to come with 100 t-pins which are what you use to hold your project in place. This is a perfect set for getting started. I store mine behind a dresser in my guest room. When I need it, I pull it out, spread it on the bed and get to work.

It is not mandatory to use blocking boards when blocking things. The main benefit is that it has a grid to help you line things up straight, and gives you the opportunity to lift your projects (very carefully) off the surface you’re using to support them so you can use that surface. My guest room has a frequent visitor, my dear mother in law, so if she’s visiting, she sleeps there at night and I move the boards somewhere else overnight.

If you are fortunate enough, as I am, to have a bed that isn’t always in use, you can just block directly on the mattress. My guest room has a ceiling fan, which I find particularly helpful to speed up the drying process. And a nice door I can close to keep the kitties away. Of course, my one kitty, Percy, likes to stretch up and open that door so I have to lock it to keep him out. But, it’s securable.

Now, if you are blocking something with long straight edges, like a shawl, afghan, sweater, table runner, etc, you might benefit from a set of blocking wires.

These are not necessary, precisely, but if you have long straight edges, they will make your life a whole lot easier. If you don’t have blocking wires, you will definitely need more pins. A LOT more pins

I like these:

T-Pins are really important and it’s essential they’re made of a high quality steel and are rust proof. I’ve had this set for years and they have served me well.

Okay, now that you have all the supplies, what next?

Whitney while being blocked

I start in the middle of a round doily and secure it with several pins. If I used just one, it might leave a mark. Even two is not enough. So I use at least 4 and try to make it look as circular as possible.

My next step is to start at approximately 12:00 and secure the outermost picot. I don’t worry about the littler ones yet. I then travel across to 6:00 and secure the corresponding picot. I repeat the steps for 3:00 and 9:00. I now step back and make sure that everything looks symmetrical. Did I actually get the right picots? Are there the same (or approximately the same) number of picots between each pin?

The next steps are pretty much the same. This was a 16 pointed circle, easily divided by 4, so I had 3 picots between each point. I would go halfway between each “quarter hour” and pin one picot, then do the corresponding picot on the opposite side. And, keep repeating that process until all the outermost pins are in place.

Next comes the tricky part. Each of these points is composed of 3 picots. If I stopped here, my points would show up, but they wouldn’t be anywhere near as lovely as the one I showed you. So you have to meticulously go around the edges and find every single little picot and spread them evenly. It can take a whole lot of pins to do this. But, why go to the trouble of making a beautiful doily if you’re not going to let it shine?

Once it’s all blocked out, it will look like this.

Some people use pins in the center, but I find I don’t have to. I stretch my work within an inch of its life and the stitches open up nicely. The more pins you use, the more likely you are to put a wonky line somewhere you don’t want. So I let it do its thing and hope for the best. You can always reblock if you need to!

So, that’s the basics of blocking doilies. They really are simple to block just a little tedious. Squares are the easiest and can be stacked to block multiple squares at a time. I make a lot of shawls, which are really long on one side and shorter on the other. They can be difficult to keep the angles symmetrical and keep the tension evenly spaced on the long side. I’ll go over my techniques for that in another post.

Happy hooking everyone!

Up until about 5 years ago, I was exclusively a big box yarn user. I had my favorites, but I never really understood why anyone would pay more than $5 for yarn.

And then I got my first hank of ArtYarns Milano, a yarn distributed by the former Craftsy (now BluPrint, they no longer sell yarn). It was 100% merino wool and a sport weight. Two things I’d never worked with. I’d always thought of wool as scratchy and unpleasant. And sport weight seemed so tiny compared to the yarns I’d worked with before!

I fell in love. The shawl I made is still one of my favorites. It’s a basic pineapple lace shawl and I finally understood why my projects were so bulky and cumbersome before.

Yarn Matters. And, when you limit yourself to big box stores (like I did), you’re missing out on a world of fabulous yarn.

Don’t get me wrong, I still spend way too much money at Michael’s, JoAnns, AC Moore and occasionally Hobby Lobby. There is some great yarn available at these stores. Durable, colorful, easy to acquire… it definitely fills a need. But sometimes you want something special and unique. That’s where small yarn shops really come in handy.

Your local yarn store is a great resource for finding new yarns, new friends, new patterns, fun buttons, notions, all things yarn related. A lot of yarn shops have crochet and knitting groups that meet regularly too! My area has between 5 and 9 small shops (depends on how far you’re willing to consider “my area”). Every spring, all 9 participate in a “yarn crawl” event and I go around and visit them all. I normally set a small budget for each store to buy something little and do my part to support small businesses.

Does your area have a yarn crawl? Check it out if so! It’s a lot of fun!

I recently learned a new technique for starting stitches and it’s made a HUGE improvement to that irritating little gap at the beginning of rows. It’s called Stacked Double (or Treble or Quadruple…) Crochet.

I’ve tried a multitude of methods but found most of them lacking. Starting with just a chain leaves a gap that I don’t like. Chainless starting double crochets don’t always look right with all yarns . I’ve slip stitched into the first stitch and then done a chain, hoping to move the stitch over and close the gap. I’ve done a modified chainless starting double crochet, where you actually pull the first loop up through the first stitch and then twist and treat like a double crochet. But, they all have their flaws and don’t match well.

Until now. I started doing a stacked double crochet and that seems the best solution! It’s a tiny bit thicker than a regular crochet, but once it’s in a finished project, it’s virtually undetectable. It’s coming in especially handy with my current project.

To start, place single crochet in the first stitch, no chain or anything. Nothing hard yet! Then, here’s the really novel part, you slip your hook in between the two vertical parts of the loop in front of you push your hook out the side of the loops, yarn over, and pull that loop back through. You should now have two loops on your hook. Yarn over and pull through two loops and you’re done! This is a single crochet, with another single crochet stacked right on top of it, thus the name “stacked” double crochet. You can repeat this process as many times as you need to achieve the height you want. A stacked treble crochet has three singles stacked on top of each other, and a stacked quadruple has four. Great stuff right?

I’m at the beach celebrating my 50th birthday this week and I neglected to bring anything to film this stitch with. When I get home, I’ll post a video and include it in this post. It’s a great way to start a project with no gaps!

You may not have ever thought of this, but it’s something worth paying attention to. What do you do at the end of a row when it comes time to turn your work?

The crochet world has a few inconsistencies, and this is one of them. It’s rarely even mentioned in patterns, and it can make a huge difference in your edges! I’m not talking about whether you chain first and then turn, or turn and then chain.

I’m talking about the specific direction you actually turn your work over. If you’re right handed, and you’re working in rows (not rounds as in a circle), when you come to the end of a row, you’re on the left corner.

If you imagine your work as though you were holding a book, you can visualize it like this. You can turn the lower right corner of your “page”, keeping your working yarn and stitch stable, like the spine of the book. When you do this, your working yarn wraps behind your work and keeps the yarn in the back where you typically are carrying it in your work. It also puts a little bit of tension on the outside of the stitch, which can help keep your edges flush and tight.

The other way is kind of flipping back a page in a book. You’re turning your work and bringing your working yarn to the front of your work. This also places some tension on the outside stitch, but might result it a bit of a bump. But, bumps can always be covered by a border, so you really have to figure out what feels more natural to you and what result you like.

I personally prefer the first way. But I used to always do the second way until I checked for the differences. This picture shows how different my edge stitches look using both methods. It took some time and conscious remembering to change that habit, but I’m much happier with the results!

So, how do YOU turn your work?

There are many ways to join your yarn. I’ve tried a lot of them, but my preferred method is the Magic Knot. And once you know how to do it, you’ll see – it really is a little bit of magic!

Here are the overall steps to check out. Detailed instructions are below.

The amazing Magic Knot!

I like to use this anywhere I need to start a new strand of yarn. It works best with yarns and threads that are not slippery – acrylic, cotton, wools, anything that has a little bit of grab to it. A slinky, slipper yarn will come undone, however. So be sure to test your knot and yank on it HARD before moving on.

Step 1: Take your working yarn and lay it out with the end facing away from your work. Your new yarn will face the opposite of that direction. This might be different if you’re left handed, so switch them appropriately.

Step 2: You’re going to start making a regular knot, which is called an overhand knot, with your new yarn. You’re going to cross it OVER your working yarn and bring it back towards you under the working yarn.

Step 3: Make a loop AROUND your working yarn and pull the new yarn tail through, making sure that your tail continues in the same direction it started. (You can pull that knot tight at this point but I left it loose for this pictorial.)

Step 4: Start your second knot with your working yarn. You will cross this strand UNDER the new yarn.

Step 5: Close your working yarn knot AROUND the new yarn by bring your tail over the new yarn and through the loop you just made, making sure that the tail is facing the same way it started, opposite of the new yarn.

Step 6: Tighten your first knot if you haven’t already done so. And I mean REALLY tighten it. You want this nice and snug and I’ll tell you why in just a minute.

Step 7: Tighten the other knot if you haven’t already done so. Same goes with this knot. Tighten it HARD!

Step 8: Grab the tail of the new yarn in one hand, and the tail of your working yarn in the other and pull them towards each other. If you tied your knots correctly, this should be fairly easy to do. Once they’re touching, give them a really hard yank.

Now, here’s where the magic comes in. As long as you followed these directions precisely, your knots are facing in opposite directions. The harder they push against each other, the tighter they become. This doesn’t hold true on yarn that is slippery, which is why I recommend you always test it before moving on. But, I have been using this knot for years with great success! It makes a very small little bump in my yarn, but once the project is worked up, it’s barely noticeable! So, let’s finish this tutorial.

Step 9: Cut the tails. Don’t be afraid to cut them right up against the knot. As long as you don’t actually cut the knot, it will be secure. I promise!

Step 10: You’re done! Look at that beautiful knot! It’s secure, and barely noticeable.

Give it a try and let me know what you think!

Anatomy of a Hook

The most important tool in your arsenal as a crocheter is your crochet hook. When I first started, I really didn’t know much about why I liked one hook or felt clumsy with another. But there are really good reasons for this!

4 sample hooks in no particular order

Hooks come in a variety of brands and styles, the two most famous being Susan Bates and Susan Boye hooks. There are some variations as well, but those are the two most common.

Let’s take a look at my favorite style first – The Susan Bates Hook.

Anatomy of a Bates Hook

Starting on the left, I’ve circled and labeled the head of the hook. There’s a closer image below that labels the parts of the head – the lip, groove, and point. Next on the upper image are the throat, shaft, thumb rest and handle. This happens to be a cushioned hook, which is nice for those of us with wrist issues.

The handle of hooks is pretty standardized. Most are long and skinny, but with our growing awareness of wrist health, there are more and more ergonomic variations available all the time. And, most hooks have a thumb rest – that flat little spot where most of us rest our thumbs. We’ll talk about different holds and different ergonomic styles in another post, because this is really important!

Next is the shaft. There can be some variables in the shaft – some are shorter and some are longer – and this becomes important when doing tunisian crochet, or long stitches with multiple wraps. For beginners, it’s not that important though.

Anatomy of a Bates crochet hook head

For most people, the head of your hook is where the important differences live. The image above shows my preferred hook (not right or wrong – my personal preference). It’s a Bates hook. If you look at the hook, you can see that the part we refer to as the point is actually kind of pointy. The groove is deep, which I find helpful to hold my yarn. And the lip is a little bit sharp and blade like, which grabs the yarn well for me.

I didn’t label the throat in the close up of the head, but it’s labelled in the photo below. On a Bates hook, which is referred to as Inline, you can see that the shaft (the part after the throat) and the head are the same diameter. There is a sharp dropoff from the shaft to the throat. If the shaft and the head are the same diameter, it might be easier to keep your stitches even, as you won’t have to loosen your work just a little to pull the head through a loop.

In this image you can see a comparison of the Boye hook to the Bates hook. If you look closely, you can see that the Bates hook is slightly pointier, where the Boye hook is slightly rounder. The groove on the Bates hook is deep but the groove on the Boye hook is shallow. Some people prefer this as they feel it’s easier to release your stitch. The lip on the Boye hook is very blunt, which some people feel makes it less likely to split your yarn. You can also see that the head of the Boye hook is noticeably larger than the shaft. For most stitches, this is something people work around, but if you ever find yourself struggling making a bullion stitch, try switching to a Bates to see if it’s easier!

So that’s the two basic styles of hooks. There are definitely pros and cons to both. But I have found personally that the one I learned with is really the one I prefer. Which is the Bates hook for me. If I try a Boye, I feel clumsy and slow. It took me a while to figure out that this was the difference, but now I know how to shop for new hooks better and am less likely to buy a hook I don’t like.

The Clover hook is kind of in the middle of these. Some people consider the Clover hook to be the best of both worlds. I’ve used them and I don’t feel as clumsy with them as I do with a Boye, so they are definitely different although they look rather similar.

So what kind of hook do you love? What do you love about them? Have you tried other styles?

Happy Hooking!

Understanding what yarn a pattern uses

So you have a pattern you want to make but how do you decide what yarn to use?

The simplest, most reliable method is to stick to the yarn the pattern recommends. The designer made this pattern with a certain yarn in mind so if you use what they recommend, your results will be the closest to the finish product.

Let’s take a look at my Sea Turtle Baby Tank published in the April 2018 issue of I Like Crochet Magazine. Isn’t she precious? Don’t you love that little turtle on her shoulder?

I had summer babies in Florida. My kids rarely wore anything that wasn’t lightweight and breathable. So, I chose this yarn with that in mind. It’s soft for babies, and has an airy design. It drapes nicely, has good stitch definition but doesn’t stretch out and become misshapen with wash or wear.

In this image, you can see what the pattern says to use for the yarn. Now, you’re always free to use a different yarn, but when you use the yarn that a designer used, a lot of the work is already done for you.

Materials for Sea Turtle Baby Tank

In this pattern, I used Loops & Threads Woolike yarn. It’s an inexpensive yarn easily available at all Michael’s stores or online.

You can see that this is a Super Fine yarn, by the yarn symbol with a 1, as well as the words undernath Super Fine. This yarn only comes in 100gram balls, and you will need less than one ball for each colorway you use. It uses one each of Navy, Ice Blue, Tan, and Sage.

In the parenthesis after each color name, you see the abbreviations MC, CC1, CC2, CC3 used. Those tell you how the colors are referred to in the pattern. And, after the abbreviations, you see numbers like this 1(1,1,1)ball. This means that you use 1 ball to achieve each size.

And, that’s really it! If you want to substitute yarns, it gets more complicated, but we’ll discuss that when we go over gauge and sizing. That’s when things really get fun!

Keep on Hooking!

Reading Yarn Labels

Yarn labels come in many varieties. Some have tons of information and you just don’t know what to make of it, some has just the basics, and then most are somewhere in between.

Red Heart Soft label

Let’s start with this label by Red Heart. It’s their Soft line. We’ll talk about the quality and texture of this line in another post, so let’s just focus on the label here.

This is the main part of the label, the part that’s on display in stores. I’ve diagrammed the label below.

Red Heart Soft Label diagrammed

You can see the logo, the weight of the ball in both ounces and grams, the dye lot (there is none), the length of the ball in yards and meters, what size knitting needles are recommended in US terms and metric, and the name of the color.

But wait! There’s more!

Detailed Red Heart Soft Label with Symbols

This is the important part when it comes to care instructions. At the top we we see the yarn weight which we discussed here. And next to that we find the knitting and crochet information.

Yarn Gauge Symbol

There’s a lot of information in that little square! You know this is the one for crochet people because of the hook in the center of the square. I’ll go into more detail in another post, but for now let’s just discuss the information as it’s presented.

Across the top and on the left side you see the size of a square that you should make to determine gauge. On the right side is the number of rows you will need to make to achieve that size square, and on the bottom is how many and why type of stitches you make.

The center of the square is the recommended hook size in US terms and metrics. This is just a guideline though. You can use whatever size you need to achieve gauge, or if you want a different effect, you can also change the size. Crochet is art! You do what makes you happy.

Below that is the care and use information.

Care information

From the left, you see a wash symbol with a number and two lines under it. 80 represents a cool wash or sometimes you will see this as a single dot, 90-104 (or 2 dots) represent a warm wash, and anything over 130 (or 3 dots) represents a hot wash. The two lines under the wash symbol indicate a gentle cycle. If there are no lines underneath, you can use a regular cycle. When in doubt, always use cold water and a gentle cyclewith your handmade items! Or better, wash by hand.

Next to that is the dryer symbol, which follows a similar system – 1 dot is tumble dry on low heat, 2 dots is medium heat, and 3 is high heat. If you see an X over this symbol it means dry flat and do not put in the dryer. You might also see two lines under this symbol, which means a gentle cycle in the dryer. When in doubt, dry flat!

The next symbol is ironing. For this yarn, there is an X over the symbol which means do not iron. This symbol can also have the dots inside, which indicate low, medium, or high heat, as with the dryer.

The triangle represents bleach. It’s rare to find a yarn that can be bleached, so you will typically see that big X over the triangle. But, sometimes it will be an empty triangle which means bleach is safe, or it will have two black stripes inside which means non chlorine bleach, like oxy clean, only.

And the final symbol is for dry cleaning. A means any solvent, P means any solvent execept trichlorethylene, and F means petroleum solvent only. Again, this symbol might have an X which indicates it cannot be dry cleaned.

Fiber content

The final bit of information on this label is fiber content. This one is 100% Acrylic. This is important for a number of reasons. We’ll talk about different types of fiber, how they behave, and why you would choose them later in this series.

Okay! Here’s a couple other labels just to see other ways you might see yarn represented.

Loops & Threads Label

This is more compact. You see the logo, with the yardage and weight right below, followed by information for a pattern that is included on the label presumably. There is a crochet hook with the recommended size and that’s about it. The yarn content was listed on the back, with the care instructions.

This is also 100% acrylic. It’s a light weight yarn, size 3, and it’s recommended that you use a 4mm or USG hook. This can be washed in warm water on a gentle cycle, dried on low heat in a gentle dryer. It should not be ironed, bleached, or dry cleaned.

Here’s another one from a small yarn maker that I love. Frequently smaller companies have less information on their labels, but the important stuff is sill there!

This is from Fairy Tale Knits. It’s a blended yarn, with 80% Superwash Merino, 10% Cashmere, and 10% Nylon. It is 435 yards, and weighs 3.5 oz. The weight is Fingering, which we know from our chart is a SuperFine yarn, or will have a yarn symbol of 1 in some patterns. It should be washed by hand and laid flat to dry.

Whew! That was a lot of information. Hope it cleared things up and we will continue this series soon!

American vs. UK vs. Metric Hook Sizes

We’ve talked a little bit about yarn and how yarn sizes aren’t terribly consistent or precise. Well guess what? Hooks are unfortunately not much different.

There are US sizes, UK sizes and metric sizes. I personally prefer metric sizes, as that seems the most precise to me – a 4.0mm hook is a 4.00mm hook, whether it’s purchased in the US or the UK, and there are tools you can buy to verify that sizing. I have this one, and use it whenever I’m in doubt.

https://amzn.to/2NbBBIH

I made this handy little chart to help demonstrate all the different names of crochet hooks. This is for non-steel hooks, which are typically aluminum, wood, or plastic. Steel hooks are smaller than these and have a different sizing system altogether! Feel free to print this chart out for future reference.

Free printable Crochet Hook Size Chart
Copyright © 2019 Carochet Designs. Some rights reserved.

Craft Yarn Council Yarn Chart

So let’s talk about the thing that is overwhelming our houses, our thoughts, our hands…. Yarn! It comes in all colors, sizes, textures, shapes, even temperatures! So, what does it all mean?

First let’s look at the official chart from the Craft Yarn Council.

Source: Craft Yarn Council’s
www.YarnStandards.com

There’s a lot of information in that chart and it can be hard to understand when we don’t all use the same language. Craft Yarn Council has helped us out a lot by standardizing these terms as much as possible, but it’s not foolproof. Some manufacturers use different terms, most stick to these guidelines as much as possible.

Looking at the top of the chart, you see these symbols:

These symbols are generally on every yarn label you will purchase. Small manufacturers may not always use them, but any large manufacturer will have one of these symbols somewhere. The number in the center of the image should be consistent with the word in the top of the image. Jumbo yarn is 7, Fine yarn is 2, for examples. Unfortunately, these terms are not always consistent in all patterns. I follow the Craft Yarn Council’s guidelines, but not everyone does, especially when you’re dealing with international manufacturers. So, you will sometimes see the following terms in patterns:

So you can see that Lace weight yarn can also be called fingering yarn, or even crochet thread! But, then – even more confusing – Super Fine yarn is also sometimes called fingering yarn. These terms are not consistent, but we do our best to explain them as well as we can as designers. And there are people working to make this more consistent.

So, how do you know if the yarn you chose will give you the desired results from a project? Gauge! That’s a whole lengthy post in itself, but we’ll discuss it briefly.

What this means is that to create a 4 inch strip of single crochet stitches with , for example, Worsted Weight yarn, you will need between 11 and 14. To measure this accurately, I would recommend you chain 20 stitches, turn, and start single crocheting across starting with the second chain until you have 4 inches. This will undoubtedly curl, but do your best to lay it flat and measure. Note that with Fingering Weight yarn, it’s recommended to use double crochets.

Okay, so you want to do that, but how do you know what size hook to use?

Thank goodness, hook sizes are pretty consistent. And, most of them have a letter AND a metric size to help make sure you’re using the right size. The most reliable sizing is metric, but check both. Note that Fingering Weight is a little wonky here again – you might use one size in a steel hook (a special hook designed for using thread, mainly to make lace or filet) and another size in a regular hook.

So, hopefully that clears up any confusion about that chart. In future posts, we’ll break down yarn labels, what kind of fiber is good for what kind of project, why you choose one weight over another, and tons more!