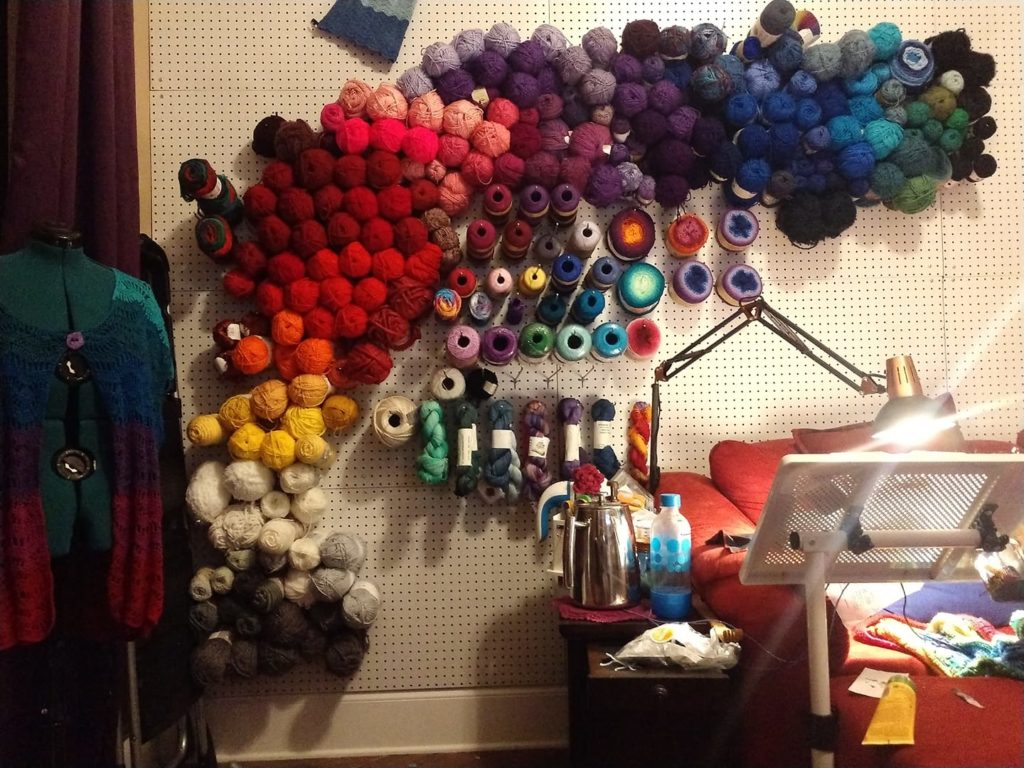
As a crochet designer or just a maker of any variety, our work area is very important. You might be sitting for a long time, so it must be comfortable. You might (like me) use a lot of different tools for your crafts so you need lots of storage. If you’re following a pattern, you need a place to read that pattern that isn’t in the way of your work, is close enough to see and can accommodate a variety of reading materials. If you’re writing a pattern, you also need a writing surface.

I spent a lot of time creating the perfect work station for me, and I think I’ve nailed it. It all centers around my adjustable table.

It’s a handy computer desk that I can adjust to different heights. The base sits under my ottoman and I keep the table in front of me and to the right as I work. The best part of it? It’s magnetic! I had no idea how important that would be until I started using it. It is seriously my favorite feature.

Here’s a close up of the surface as I use it.

That’s a lot of stuff! But, it’s all at hand’s reach and I can manage each thing pretty much with only one hand. The magnets are the key to making it work so well.

  1. Push Pin Magnets Love these! They look like push pins, but they’re magnets. Pretty self explanatory, lol.
  2. Pop Socket Phone Holder Makes it easy to tilt my phone for various reasons and keeps it out of the way.
  3. Burt’s Bees Lip Balm I happen to live very close to the Burt’s Bees home office, so it’s near and dear to my heart.
  4. My ceiling fan remote! Isn’t it easy to lose those things? So much easier to keep track of now and always at hand’s reach.
  5. Locking Stitch Markers I cannot have too many of these. I lose them constantly. So I keep this box full and my backups are stored in a drawer nearby.
  6. TV Remote – I stuck a magnet on the back of this so it just snaps into place and I never lose it anymore!
  7. Cuticle Cream What is more annoying than a hangnail when you’re crocheting, right?
  8. Composition Notebook I buy these at back to school time when they’re super cheap. I keep a few dozen hand to last through the year.
  9. USB C Phone charger, and there’s a white micro USB Charger on hand for older devices. My Kindle for example.
  10. Tape Measure
  11. Embroidery Scissors I like these because they come with extra point guards so the pair I keep in my bag doesn’t stab me.
  12. Bent Tip Needles I talk about why I like these in this post. http://carochetdesigns.com/sewing-in-ends/
  13. Nail File I’m a bit of a nail fanatic. I like my nails to be pretty, but I really hate when they snag yarn. So, I have tons of these!
  14. Pencil Cup – built in and holds my crochet hook when not in use so it doesn’t slip between the couch cushions
  15. Tweezers A good pair of tweezers will last forever. I used to be a professional hairdresser (before having kids) and I’ve had this pair for over 20 years. They help with fiddly little bits like nothing else.
  16. Pocket Knife I swear by this thing. I have two of these. I thought I’d lost one so I bought a second because it’s indispensible. We were in the middle of a major move, though, and it turned up about a year later. I keep one on my key ring and my spare on my work station. I’ve been known to give these as gifts because it almost always comes out at crochet nights.
  17. Miscellaneous other papers – this one happens to be my daughter’s Starbucks work schedule for next week, but this could be a pattern, notes from a previous project, a yarn label, anything!

That’s a whole heck of a lot of stuff to manage and it’s all in one place. If you don’t have a magnet board near your work area, I’d highly recommend one! I have a couple dozen of these magnets scattered around ready to be stuck to non magnetic things or grab whatever loose items I might have.

https://amzn.to/36W8PlL

How do you keep your work area organized?

Anyone who’s crocheted for any amount of time thinks that the WORST part of projects is sewing in ends. Okay it’s me. I’m anyone. And I hate sewing in ends.

I’ve experimented with a variety of methods and spoken to many crocheters about it and I’ve decided the absolutely MOST IMPORTANT TIP is to leave your ends long enough. Like about 12 inches. Unless you’re playing yarn chicken, and then you do what you have to do.

If your end is long enough, you have room to sew in ends right. You won’t use all this length, but you’ll use maybe half of it. If your end is too short, that last little pass through will be extremely hard and you might have to resort to some special tricks to make it work.

First, start with the best needle. I like stainless steel best. Aluminum gives me the heeby jeebies. It squeaks and sounds like fingernails on a chalkboard to me. So don’t fall for the pretty colored needles. Unless you like that sort of thing. 😉

These are my favorite needles. Clover Bent Tip Tapestry Needles The little bent end makes it super easy to get in the tiny spaces between your stitches. And since they’re stainless steel, they’re also magnetic, so they stick to the magnets on my work easel. Major bonus points on that one.

Next, once you have your yarn threaded, you weave your ends into the bottom of your stitches for at least 10 stitches, making sure you poke in between the plies on your last stitch. Next, turn around and go back through the same stitiches, but be certain you don’t go back through that first yarn split. Again, with the last stitch, you want to go between the plies on the final stitch. You may do this a third time depending on the project. I usually do, because I want that extra length available in case something goes wrong after the project is done, but it should be secure enough with just two passes if you have a delicate project and you don’t want the bulk to show through.

That’s it! Snip the yarn as close to the end as you can, and I normally rough up the edges just a bit to hopefully tangle them together and add a measure of security. This is particularly effective with wool and other knotty yarns.

Happy Hooking!

Anatomy of a Hook

The most important tool in your arsenal as a crocheter is your crochet hook. When I first started, I really didn’t know much about why I liked one hook or felt clumsy with another. But there are really good reasons for this!

4 sample hooks in no particular order

Hooks come in a variety of brands and styles, the two most famous being Susan Bates and Susan Boye hooks. There are some variations as well, but those are the two most common.

Let’s take a look at my favorite style first – The Susan Bates Hook.

Anatomy of a Bates Hook

Starting on the left, I’ve circled and labeled the head of the hook. There’s a closer image below that labels the parts of the head – the lip, groove, and point. Next on the upper image are the throat, shaft, thumb rest and handle. This happens to be a cushioned hook, which is nice for those of us with wrist issues.

The handle of hooks is pretty standardized. Most are long and skinny, but with our growing awareness of wrist health, there are more and more ergonomic variations available all the time. And, most hooks have a thumb rest – that flat little spot where most of us rest our thumbs. We’ll talk about different holds and different ergonomic styles in another post, because this is really important!

Next is the shaft. There can be some variables in the shaft – some are shorter and some are longer – and this becomes important when doing tunisian crochet, or long stitches with multiple wraps. For beginners, it’s not that important though.

Anatomy of a Bates crochet hook head

For most people, the head of your hook is where the important differences live. The image above shows my preferred hook (not right or wrong – my personal preference). It’s a Bates hook. If you look at the hook, you can see that the part we refer to as the point is actually kind of pointy. The groove is deep, which I find helpful to hold my yarn. And the lip is a little bit sharp and blade like, which grabs the yarn well for me.

I didn’t label the throat in the close up of the head, but it’s labelled in the photo below. On a Bates hook, which is referred to as Inline, you can see that the shaft (the part after the throat) and the head are the same diameter. There is a sharp dropoff from the shaft to the throat. If the shaft and the head are the same diameter, it might be easier to keep your stitches even, as you won’t have to loosen your work just a little to pull the head through a loop.

In this image you can see a comparison of the Boye hook to the Bates hook. If you look closely, you can see that the Bates hook is slightly pointier, where the Boye hook is slightly rounder. The groove on the Bates hook is deep but the groove on the Boye hook is shallow. Some people prefer this as they feel it’s easier to release your stitch. The lip on the Boye hook is very blunt, which some people feel makes it less likely to split your yarn. You can also see that the head of the Boye hook is noticeably larger than the shaft. For most stitches, this is something people work around, but if you ever find yourself struggling making a bullion stitch, try switching to a Bates to see if it’s easier!

So that’s the two basic styles of hooks. There are definitely pros and cons to both. But I have found personally that the one I learned with is really the one I prefer. Which is the Bates hook for me. If I try a Boye, I feel clumsy and slow. It took me a while to figure out that this was the difference, but now I know how to shop for new hooks better and am less likely to buy a hook I don’t like.

The Clover hook is kind of in the middle of these. Some people consider the Clover hook to be the best of both worlds. I’ve used them and I don’t feel as clumsy with them as I do with a Boye, so they are definitely different although they look rather similar.

So what kind of hook do you love? What do you love about them? Have you tried other styles?

Happy Hooking!

American vs. UK vs. Metric Hook Sizes

We’ve talked a little bit about yarn and how yarn sizes aren’t terribly consistent or precise. Well guess what? Hooks are unfortunately not much different.

There are US sizes, UK sizes and metric sizes. I personally prefer metric sizes, as that seems the most precise to me – a 4.0mm hook is a 4.00mm hook, whether it’s purchased in the US or the UK, and there are tools you can buy to verify that sizing. I have this one, and use it whenever I’m in doubt.

https://amzn.to/2NbBBIH

I made this handy little chart to help demonstrate all the different names of crochet hooks. This is for non-steel hooks, which are typically aluminum, wood, or plastic. Steel hooks are smaller than these and have a different sizing system altogether! Feel free to print this chart out for future reference.

Free printable Crochet Hook Size Chart
Copyright © 2019 Carochet Designs. Some rights reserved.

I have been working furiously behind the scenes trying to organize my overly massive yarn stash. You know the type – a few boxes here, some bags of yarn stored in my bedroom closet, some baskets full in the living room, unfinished objects stored here there and everywhere – it’s totally out of hand!

Back in January, I decided that everyone else in my home had their own space and I deserved some too! I’m the mom, after all. Why am I the last to have a space of my own? So, I set about cleaning out the chaos that was our “game room”. It was full of unused homeschool supplies, various items that nobody knew what to do with, and lots of video games that my son played in there. With his help, we whittled down the mess and I was able to create a nice living space in there. I like it a lot! But, so does everyone else, lol, so the space mom set up for herself is also communal. Isn’t that the way it goes?

But, I’m getting more serious about getting my business started and that meant phase 2 kicked into high gear after the conference. There isn’t a lot of storage space in this room and all the floor space is taken up by the big comfy sofa and my desk so I had to get creative.

Enter pegboard!

I covered the one big wall that has no windows or doors with pegboard. 10 pieces of 2×4 foot pegboard, to be precise. It is a hugely versatile storage solution and I encourage you to consider too. Best part, it’s affordable! And modular so you can build it as you need it!

Just a couple more to go!

Once the wall was in place, I started with one hundred 4 inch hooks. They hold about 1 ball each. Anyone know how long that lasted? About 2 hours before I realized I needed a lot more.

Now some people get all tidy and wind each ball on their winders, but who’s got time for that! I decided to go with a more lackadaisical method – hang it the way it is. So some is hung as balls, some as cakes, some as skeins, some as hanks. I didn’t get too hung up on color perfection either. I did mostly an arc that follows the colors of the rainbow but there’s room for expansion at the top and bottom. The result is a beautiful piece of wall art that gets all my yarn where I can see it for inspiration.

Not totally finished but all the yarn from one room is managed!

Want to build your own? Here’s a quick list of all the supplies I used:

4 inch hooks – the vast majority of my yarn is hung on these hooks. I can fit most medium balls and cakes on these hooks. I have purchased 350, but in the pictures on this post, I have only used about 250:

10 inch hooks – hold 3 small balls of thread, 2 large balls of thread, larger skeins of yarn like RHSS, or multiple hanks of yarn. I currently have 100 but will soon be ordering more:

50 total small plastic hooks in two shapes – these are to display finished projects and support my Yarn Vault sign. One package is all you need to do a wide variety of tasks.

12 inch hooks – these aren’t really necessary, but they hold large skeins of yarn slightly better than the 10 inch hooks. I’m only using a few here and there.

https://amzn.to/2Lkjld1