Diabetes and Me, part 3
So I have shared my story about how I was diagnosed with Type 2 (T2) Diabetes, and how Diabetes works in the body. This post is about relearning what I knew about nutrition, and how we used to treat Diabetes.
Historically, if you were diagnosed with “sugar disease” you would be instructed to follow a low carb, high fat/high protein diet. The next few images come from a book dated 1917. Artifical insulin wasn’t discovered until 1922, so this is what people did before they could medicate.
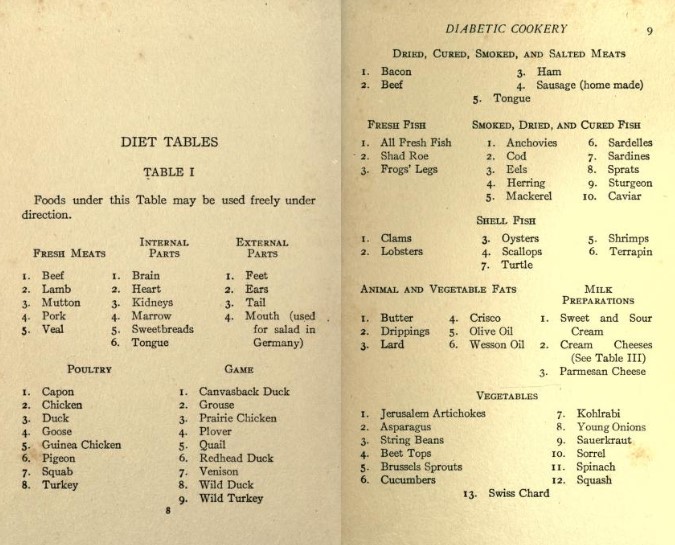
Table 1 shows acceptable proteins in the Diabetic Cookery Diet, some fats, and starts to list vegetables. Some are a little, um, gross? REALLY? They eat MOUTH in Germany? But, mostly it’s foods that most people know to be low carb.
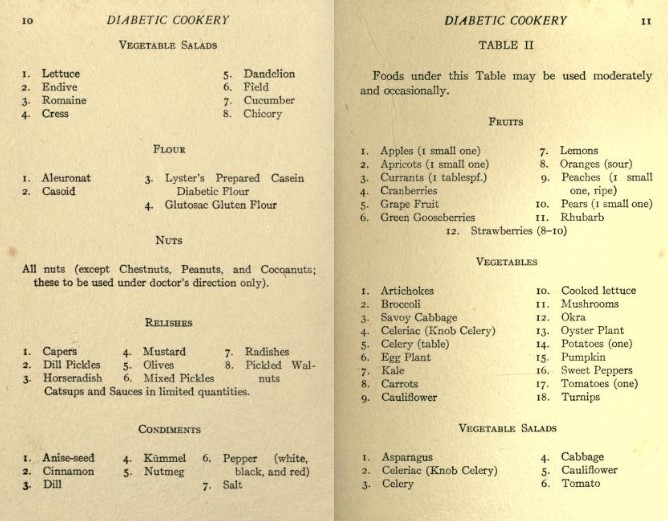
The page on the left is a continuation of Table 1, more vegetables, nuts, flours, condiments. The page on the right are the foods you would eat less of, but are still acceptable in controlled amounts.
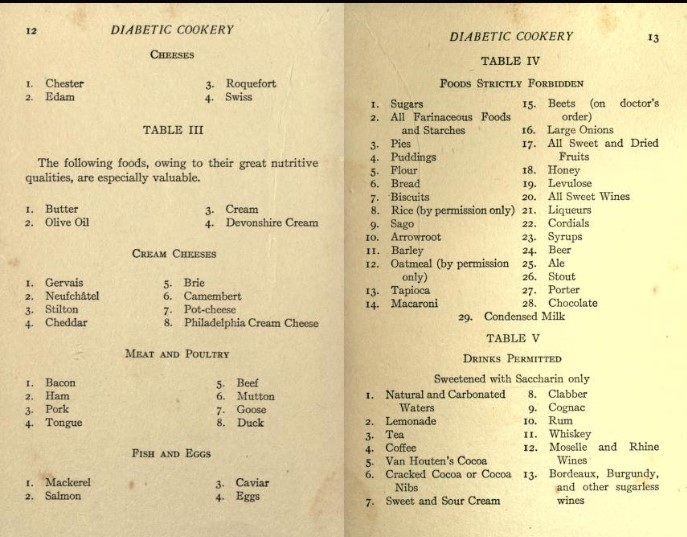
And my favorite table: Table 3 shows highly nutritious foods that will fill you and keep your energy up. Table 4 shows foods you should avoid at all costs. These foods will raise your blood sugar unsafely, so just don’t eat them. And then a list of beverages.
Notice anything? If you’re at all familiar with the Keto Diet, these items should be pretty familiar to you. There are a few exceptions but mostly the allowable foods align with Keto, and the avoid at all costs foods do as well.
Why did we ever stop doing this????
If you are over 40 and overweight, Type 2 Diabetes is a real risk for you. Get a physical every year, and if your fasting blood sugar is over 100, that’s the first sign that something is starting to go wrong. If you catch it early, you can prevent further damage and major stress. I ignored my doctors when my fasting levels were starting to creep up because my A1C was still “acceptable”. And I had a horrible experience with hospitalization as a result.
Once I got home from the hospital, I started reading everything I could. I had heard of keto, and having dealt with gestational diabetes during both of my pregnancies, I was familiar with carb counting. But, Keto limits you to a total of 20 carbs a day. The American Diabetes Association diet recommends 1-2 carb servings of approximately 15 carbs each 4-6 times a day. And suddenly I was going to limit myself to one carb serving for an entire day???? Seemed impossible.
The first night, I was overwhelmed. I hadn’t eaten anything other than one hard boiled egg in 3 days. Food was intensely frightening to me. I was checking my blood sugar constantly and despite having no food in my system, my blood sugar was still in the high 200s. How could this be happening?
Fortunately, my kids are both foodies and my sweet daughter came to my rescue with a beautiful salad prepared with low carb items – grilled chicken, sunflower seeds, cheese, and I don’t even remember what else, but it had olive oil and vinegar drizzled over top. It was presented beautifully and with so much love.
I ate it tentatively, but it was delicious. I was terrified that my body was going to betray me further and my blood sugar was going to sky rocket. But, that didn’t happen. This was the beginning of learning to trust my body again, recognize what I really needed, and resume loving food.
It was extremely scary those first few weeks relearning everything I thought I knew about food. My mantra in the beginning was “more butter please!” and I put butter on everything!
The strangest part of going keto was recognizing that fat was totally okay. I was always the person who picked the skin off the turkey and snuck a bite when nobody was looking. Or put gobs of butter on my bread, because bread was just a vehicle to get butter in my mouth. That fat I always trimmed off my steak was really just for show. If I thought nobody was looking, I’d totally eat it! I was so full of shame for loving fat and avoiding lean. But suddenly, that was my goal! All the fat! None of the lean! And it was okay?!?!?! Yes. It is okay!
I have always heard that high cholesterol is caused by eating too much fat. I started to learn that is simply not true. With all the things that were wrong with me, my cholesterol was perfectly fine. So, this was not something I needed to worry about. I decided to dive in to keto, monitor my health markers, and see how things went.
My starting point: – March 17, 2018
| Test | Result |
| A1C | 11.3 |
| Average daily glucose | 278 |
| Cholesterol | 166 |
| Triglycerides | 92 |
| LDL | 92 |
| Cholesterol/HDL Ratio | 3.0 |
| HDL | 56 |
Next up we’ll look at what I started eating! I know it will surprise people who aren’t familiar with keto.
Diabetes and Me, part 1
This is my personal account about why I went and continue to stay Keto. It’s not crochet related but it’s an important part of who I am. Occasionally I might share recipes that I really love, but this is a crochet blog, so it won’t ever be frequent. 🙂
On March 17, 2018 I woke my husband up in the middle of the night because I was doubled over in pain for hours and was unable to sleep. I was fighting through as hard as I could, but no amount of ibuprofen was working and I knew it was time to go to the Emergency Room. Fortunately our kids are teenagers so we left them a note and headed out.
They put me in a room and started observing me and running tests. I’d had kidney stones before, so I was pretty sure that was the problem, but my previous stones had never hurt like this. The first eye opening test was my blood glucose. It was 414. If you’re unfamiliar with what normal might look like, mine should have been 100 or lower as I hadn’t eaten for at least 8 hours. At that point a hospital admission was pretty much guaranteed, but they needed to stabilize me first so they kept monitoring me and trying to manage my pain and high glucose
They gave me a few different meds, insulin to bring down my blood sugar, something for bladder and kidney related pain, I think there might have been some percocet, and I don’t even know what else. Nothing helped my pain, but my blood sugar did start to come down so they were able to rule out ketoacidosis, which is a very dangerous situation for people and is not at all related to ketosis, but more on that later.
They kept asking me what meds had worked before. I knew that I’d been less responsive to morphine in the past and had to have fentanyl after my gall bladder surgery many years ago. But I’m also aware of the opioid crisis we’re in and the room next to me was housing a person who was clearly drug seeking (plus he had two police officers stationed outside his room and he was handcuffed to the bed) so I felt uncomfortable asking for fentanyl. I told them I didn’t know what helped, which I deeply regret. We should be able to ask for the meds that help us when we really need them.
They gave me a low dose of morphine and watched. It did nothing so they gave me more. Still nothing. At this point I’d been there a few hours and they started talking about transferring me to the hospital. My blood sugar was still coming down (still in the 300s though), but I was clearly diabetic and needed some medical intervention for my kidney.
For the ride over to the hospital, they gave me fentanyl. At long last my pain was starting to subside. My husband drove home to get some food, tell the kids what was going on and gather some things to keep me comfortable in the hospital (like my crocheting!) and then met me after I was settled into a room.
The next couple of days are a blur of surgery – I needed a kidney stent as my left kidney was blocked by stones, more testing, and a variety of stern lectures by various doctors about the severity of my Type 2 Diabetes. I received all kinds of bad advice from hospital personnel. One nurse told me that diabetes was not a death sentence, I could still eat whatever I want as long as I countered my intake with insulin. The hospital nutritionist told me to eat 1-2 carb servings (of up to 15 carbs each) 6 times a day, but absolutely no more than that!
The most important thing they wanted to impress upon me was that Diabetes was a progressive and degenerative disease. I would without doubt die from complications related to Diabetes. The risks included loss of vision, loss of extremities, heart disease, kidney problems, and many more.
So, what did they do? The first meal they brought me in the hospital was chicken parmesan – breaded chicken with tomato sauce on pasta, with green beans, a piece of sheet cake (with frosting!) and a sweet tea! At least 100 carbs worth of food, probably more than that. I refused to eat it. I told the nurse I was newly diagnosed with diabetes and I didn’t think that I should eat anything on that plate so she replied “honey, you have to eat something! At least eat the cake!” I don’t think I’ll ever get over that statement.
I was filled with anxiety and dread about eating. I have always loved food and cooking. This fear of eating was completely foreign to me. I knew there had to be a way to get through this but all the conflicting information just felt so wrong. My body couldn’t manage carbs normally. Eating carbs caused my blood sugar to go crazy. Doctors and nurses were saying eat carbs. My brain couldn’t handle it.
Fortunately, I had a little exposure to keto. My best friend had recently lost 30 pounds doing keto and I’d actually planned to start the Monday after St. Patrick’s Day. But, let’s be honest, who knows what I would have done if I hadn’t had my medical crisis.
I left the hospital without really eating, but went home and started research. They’d equipped me with insulin and a diet plan which involved almost 200 carbs a day. My glucose had only dropped to the low 200s while in the hospital eating nothing except a single hard boiled egg (which I knew was keto and ate under duress). I was clearly sick and I had to tackle this. I went home and started researching.
The research blew me away. And it changed my life for good. More in another post.
My Work Station
As a crochet designer or just a maker of any variety, our work area is very important. You might be sitting for a long time, so it must be comfortable. You might (like me) use a lot of different tools for your crafts so you need lots of storage. If you’re following a pattern, you need a place to read that pattern that isn’t in the way of your work, is close enough to see and can accommodate a variety of reading materials. If you’re writing a pattern, you also need a writing surface.
I spent a lot of time creating the perfect work station for me, and I think I’ve nailed it. It all centers around my adjustable table.

It’s a handy computer desk that I can adjust to different heights. The base sits under my ottoman and I keep the table in front of me and to the right as I work. The best part of it? It’s magnetic! I had no idea how important that would be until I started using it. It is seriously my favorite feature.
Here’s a close up of the surface as I use it.

That’s a lot of stuff! But, it’s all at hand’s reach and I can manage each thing pretty much with only one hand. The magnets are the key to making it work so well.
- Push Pin Magnets Love these! They look like push pins, but they’re magnets. Pretty self explanatory, lol.
- Pop Socket Phone Holder Makes it easy to tilt my phone for various reasons and keeps it out of the way.
- Burt’s Bees Lip Balm I happen to live very close to the Burt’s Bees home office, so it’s near and dear to my heart.
- My ceiling fan remote! Isn’t it easy to lose those things? So much easier to keep track of now and always at hand’s reach.
- Locking Stitch Markers I cannot have too many of these. I lose them constantly. So I keep this box full and my backups are stored in a drawer nearby.
- TV Remote – I stuck a magnet on the back of this so it just snaps into place and I never lose it anymore!
- Cuticle Cream What is more annoying than a hangnail when you’re crocheting, right?
- Composition Notebook I buy these at back to school time when they’re super cheap. I keep a few dozen hand to last through the year.
- USB C Phone charger, and there’s a white micro USB Charger on hand for older devices. My Kindle for example.
- Tape Measure
- Embroidery Scissors I like these because they come with extra point guards so the pair I keep in my bag doesn’t stab me.
- Bent Tip Needles I talk about why I like these in this post. http://carochetdesigns.com/sewing-in-ends/
- Nail File I’m a bit of a nail fanatic. I like my nails to be pretty, but I really hate when they snag yarn. So, I have tons of these!
- Pencil Cup – built in and holds my crochet hook when not in use so it doesn’t slip between the couch cushions
- Tweezers A good pair of tweezers will last forever. I used to be a professional hairdresser (before having kids) and I’ve had this pair for over 20 years. They help with fiddly little bits like nothing else.
- Pocket Knife I swear by this thing. I have two of these. I thought I’d lost one so I bought a second because it’s indispensible. We were in the middle of a major move, though, and it turned up about a year later. I keep one on my key ring and my spare on my work station. I’ve been known to give these as gifts because it almost always comes out at crochet nights.
- Miscellaneous other papers – this one happens to be my daughter’s Starbucks work schedule for next week, but this could be a pattern, notes from a previous project, a yarn label, anything!
That’s a whole heck of a lot of stuff to manage and it’s all in one place. If you don’t have a magnet board near your work area, I’d highly recommend one! I have a couple dozen of these magnets scattered around ready to be stuck to non magnetic things or grab whatever loose items I might have.

How do you keep your work area organized?
Sewing In Ends
Anyone who’s crocheted for any amount of time thinks that the WORST part of projects is sewing in ends. Okay it’s me. I’m anyone. And I hate sewing in ends.
I’ve experimented with a variety of methods and spoken to many crocheters about it and I’ve decided the absolutely MOST IMPORTANT TIP is to leave your ends long enough. Like about 12 inches. Unless you’re playing yarn chicken, and then you do what you have to do.
If your end is long enough, you have room to sew in ends right. You won’t use all this length, but you’ll use maybe half of it. If your end is too short, that last little pass through will be extremely hard and you might have to resort to some special tricks to make it work.
First, start with the best needle. I like stainless steel best. Aluminum gives me the heeby jeebies. It squeaks and sounds like fingernails on a chalkboard to me. So don’t fall for the pretty colored needles. Unless you like that sort of thing. 😉
These are my favorite needles. Clover Bent Tip Tapestry Needles The little bent end makes it super easy to get in the tiny spaces between your stitches. And since they’re stainless steel, they’re also magnetic, so they stick to the magnets on my work easel. Major bonus points on that one.
Next, once you have your yarn threaded, you weave your ends into the bottom of your stitches for at least 10 stitches, making sure you poke in between the plies on your last stitch. Next, turn around and go back through the same stitiches, but be certain you don’t go back through that first yarn split. Again, with the last stitch, you want to go between the plies on the final stitch. You may do this a third time depending on the project. I usually do, because I want that extra length available in case something goes wrong after the project is done, but it should be secure enough with just two passes if you have a delicate project and you don’t want the bulk to show through.
That’s it! Snip the yarn as close to the end as you can, and I normally rough up the edges just a bit to hopefully tangle them together and add a measure of security. This is particularly effective with wool and other knotty yarns.
Happy Hooking!
Classic Blue – It’s the Pantone Color of the Year!

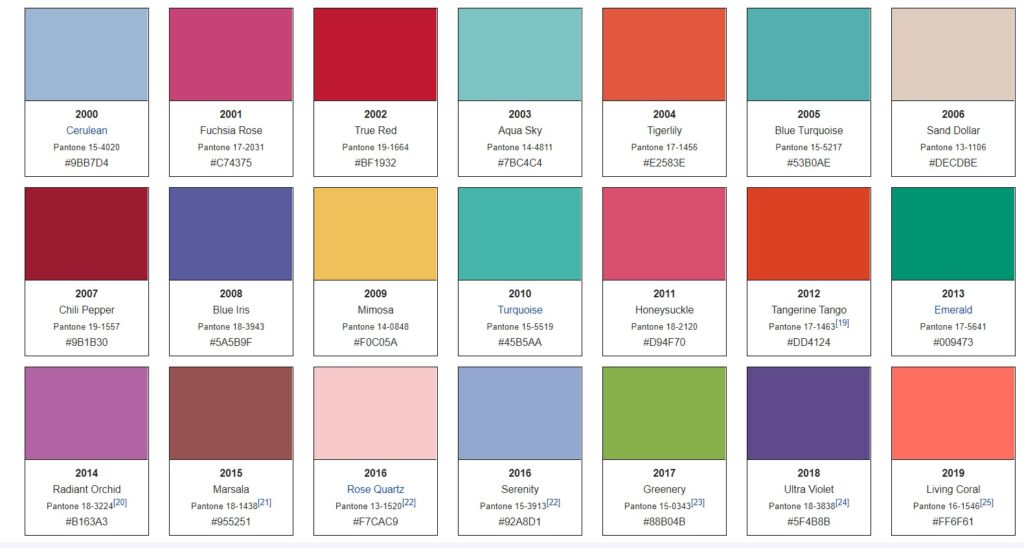
Every year since 2000, Pantone has released the Color of the Year. The idea is that this is a color trendsetters predict will be the hot color of the year, whether it’s fashion, home decor, graphic arts, product packaging, even automobile colors.
I see this year’s color as a definite hit. Who doesn’t love blue? This image evokes calm, water, the endless night sky – it’s a peaceful color and one can always hope that’s the direction our world is taking, right?
Here are the past colors in one image. 2016 had two colors for some reason. I guess they couldn’t narrow it down to one popular winner that year? But other than that, each year is represented by one color. How well do you think they did?
New Year, New Yarn?
So it’s the New Year, 2020. Hard to believe. And the topic of the moment is “What resolutions have you made?” I’m not a resolution person myself, so that question inspires nothing in me but rebellion. I resolve to not make resolutions!
But, not making resolutions doesn’t mean I’m not constantly making goals for myself. I just don’t like to associate them with the start of a new year because I’m constantly reevaluating my goals to keep them current and in line with my progress.
One goal I’ve got laid out right now is to blog twice a week. Over the holidays, I slacked off a a little but, but the holidays are over and I’m back on track.
I also plan to release at least one new pattern per month which I started in December. That one is a little scary to me, but nothing ventured, nothing gained, right? So far I’ve been a lot of talk and a little action. I need to make that more action and less talk. 🙂
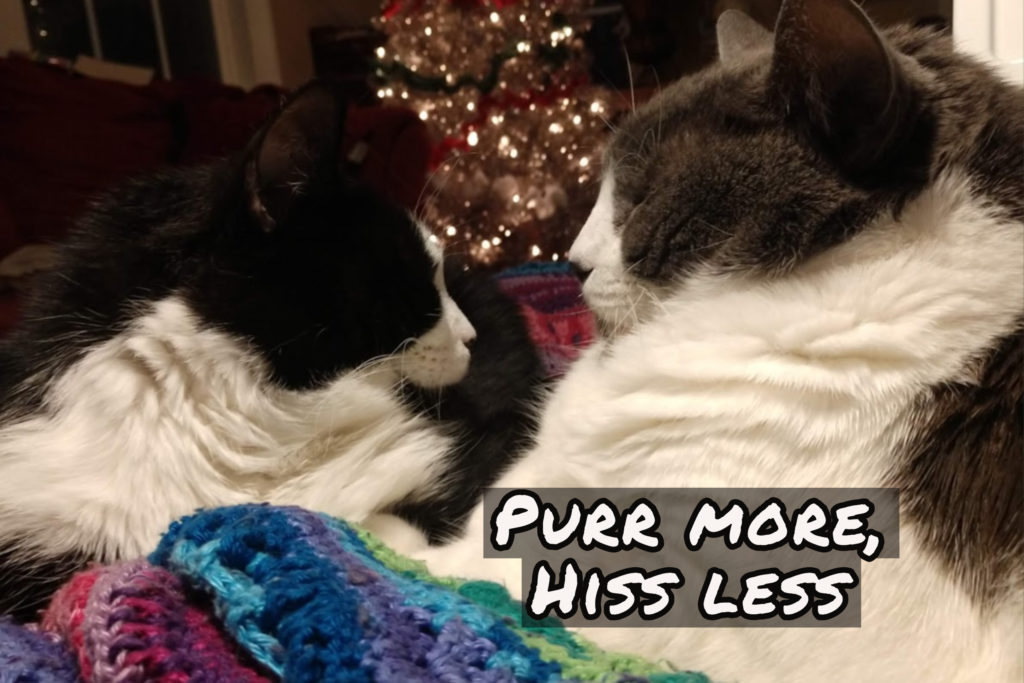
You can almost hear them purring, can’t you?
So, what’s on your list of goals these days? Anything yarn related?
All About Yarn, Multi-Color
Until fairly recently, if you wanted a variety of colors in a project, a basic crocheter was limited to two varieties of color changes variegated yarn or manual changes.
Variegated yarn has short color changes which generally repeat regularly and produces irregular color changes, sometimes pooling in one patch of your finished fabric. Pooling is a term used for the way variegated yarn can line up and with careful planning can be used to create beautiful plaid fabrics. This technique is called “planned pooling, and we will explore this in a later post.
This photo below shows a short color changing yarn in a ball and in the finished cabled fabric.
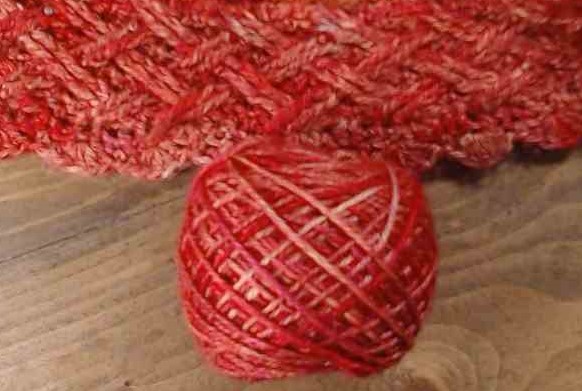
You can see the short stretches of light color in the ball and they show up as just lighter areas in the fabric. And the darker stretches do the same thing. You end up with a lightly mottled effect which is beautiful, especially when contrasted with solids or very similarly colored variegated yarns.
A longer color change produces a very different result. This yarn has long, almost striping length color changes. The changes are blended well, unlike some other striping yarns (which change abruptly, sometimes in the middle of a stitch!) but you get a fun contrast of many colors with just one ball.

This yarn is also presented in a really fun way so you see the clusters of color as they will stripe! It worked really well in this sweater below. This is not the identical colorway, but it’s the same yarn. The stripes are probably about 30 yards or maybe a little bit more. Enough that you can definitely make a pair of socks that stripe nicely, and probably some nice stripes on a sweather, but stripes would be very thin and may not extend the full width of larger projects, like a shawl or afghan.

Notice how the petals are striped and the ribbed area has a more ombre effect. Long, gradual color changes produce both of these variations with the stitchwork accenting them in different ways.
Recently, the hottest trend is extremely long, gradual color changes. These color changes happen over a 100 yard length or even more. These are generally four ply yarns (in several different weights) and the colors are changed very gradually, one ply at a time so it can be very hard to determine where the change happens once a project is finished.

This example has some pretty dramatic changes so you can get an idea of what that really looks like. Look at where the blue and lavender meet. There are some strands that almost appear candy striped. It does not look that dramatic in a finished project though.
This is an example of an ombre version of that yarn. It goes from black to white and then I bordered it with more black. You don’t really see where the change happens, but the overall effect is fabulous!

This is not the finished version of this shawl. I hope to have it released soon in it’s final version though!
So you can see, there are a number of variations on color changing yarn. I am not fond of the cakes of yarn that are sold with abrupt color changes. The aesthetic just doesn’t work for me. I find myself constantly staring at the one stitch where the change happened and it bugs me immensely. But, the colors and availability of that yarn are hard to resist! If you’re like me and that stitch will bother you, you can always cut the yarn at the end of a row when you think there isn’t enough of the same color to finish another row and start the new color early. It’s much easier on the eyes to have stripes start with a new row than interrupt another row.
Hope that’s helpful! Happy Hooking!
Copyright Protection – UPDATE! And it’s good news!
So, I’ve really been struggling with what I understood about copyright laws. Specifically why companies like Disney are protected but lowly designers like me are not. I have been told from numerous sources that the words in your pattern are protected but nothing is stopping anyone else from making their own version of your pattern using their own words. And, in fact, I’ve even been told that designers all know this and struggle with it, but don’t talk about it because of how vulnerable it makes us all.
I am here to tell you THAT IS WRONG!!! And, oh my gosh, thank GOODNESS for that. I have been paralyzed by fear because of this. I have so many patterns waiting to be released and my biggest obstacle has been the thought of people taking my creative ideas and publishing themselves. Someone who is better known could easily get better exposure than I can and that just terrified me.
I have been digging and digging trying to find an answer that I could live with. And, I think I made more than a few people angry with my questions. But, it all led to this.
“Copyright protects original “pictorial, graphic, and sculptural works,” which include two- and three-dimensional works of fine, graphic, and applied art. Examples of such works include … Patterns for sewing, knitting, crochet, needlework …” all copied from page 1 of this document. https://www.copyright.gov/circs/circ40.pdf
Huzzah! I’ve read the copyright law and it’s not specifically stated in the original law, but as you can see, there are at least 40 circulations that expand upon the initial legalese, and that’s a pretty big mountain of paperwork I hadn’t tackled.
So, spread the word far and wide. This is a common misunderstanding in the crochet/knitting world. Patterns are, in fact, protected by copyright laws.
And if you want to double down on your protect, you can register your work at this link. https://www.copyright.gov/registration/ for $35.
Now that I have a better understanding, I’m no longer fuming at the injustice of corporations having access to something the little guy does not. We are protected! Designs are protected! I can relax now and that feels so much better!
Snowman Tree Topper
It’s here! I’m so excited to release this pattern to you! I have worked very hard for the last week getting everything ready to go in time for Christmas and it looks like it’s going to work out after all!
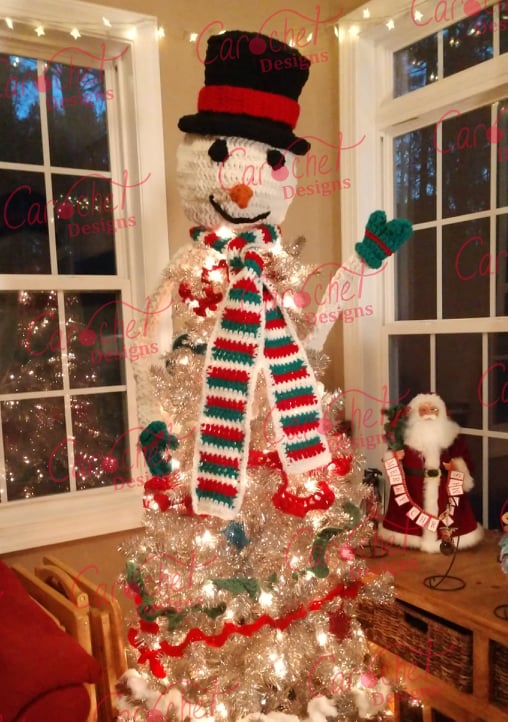
Isn’t he adorable? I had so much fun making him! I released my garland pattern a couple of weeks ago and realized that my tree needed a topper of some sort. I started researching and really didn’t like anything I saw that was manufactured. And this tree is in my Yarn Vault, and is destined for handmade ornaments, so why not make something for it?
The something had to be really special though. A star is beautiful, but I like big, creative things, so it seemed too minimal. I wanted a LOT OF PERSONALITY!
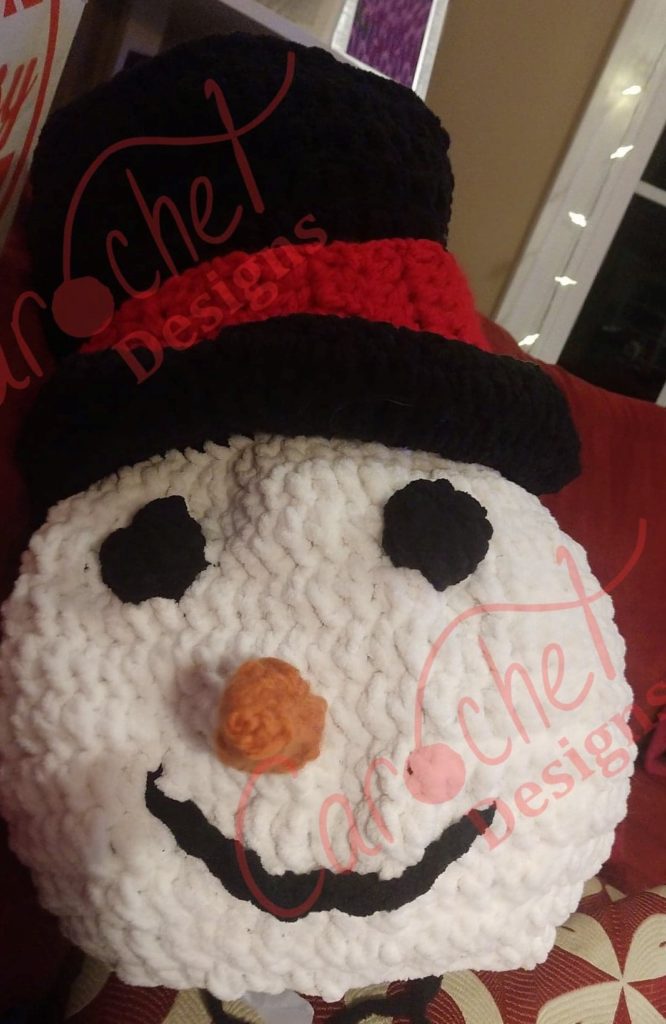
Thus Mr. Snowman was born. He has a lot of character and really brightens the room with his cheerful smile and welcoming wave, don’t you think?
This pattern was thrown together very quickly and I didn’t have time to test it. Because of that, I’m offering a ONE HUNDRED PERCENT Discount for the first 100 purchases in the first 48 hours.
In addition, if you are the first one to find a mistake that requires correction, I will offer you one free future pattern! I have 15 patterns waiting to be released over the next few months so there will be plenty to choose from!
Click here for the coupon code!
There are some pictures included in the pattern which will be updated as I make a second version.
I hope you love him as much as I do!
Happy Hooking!


